A 3 × 3 m exhibition stand provides nine square metres, but the usable space depends on the open sides, the depth of the display feet and the activities you need to accommodate. Plan the visitor route first, then fit the backwall, counter and equipment around it. A clear layout helps a small team explain the offer without blocking the entrance or turning the stand into storage.
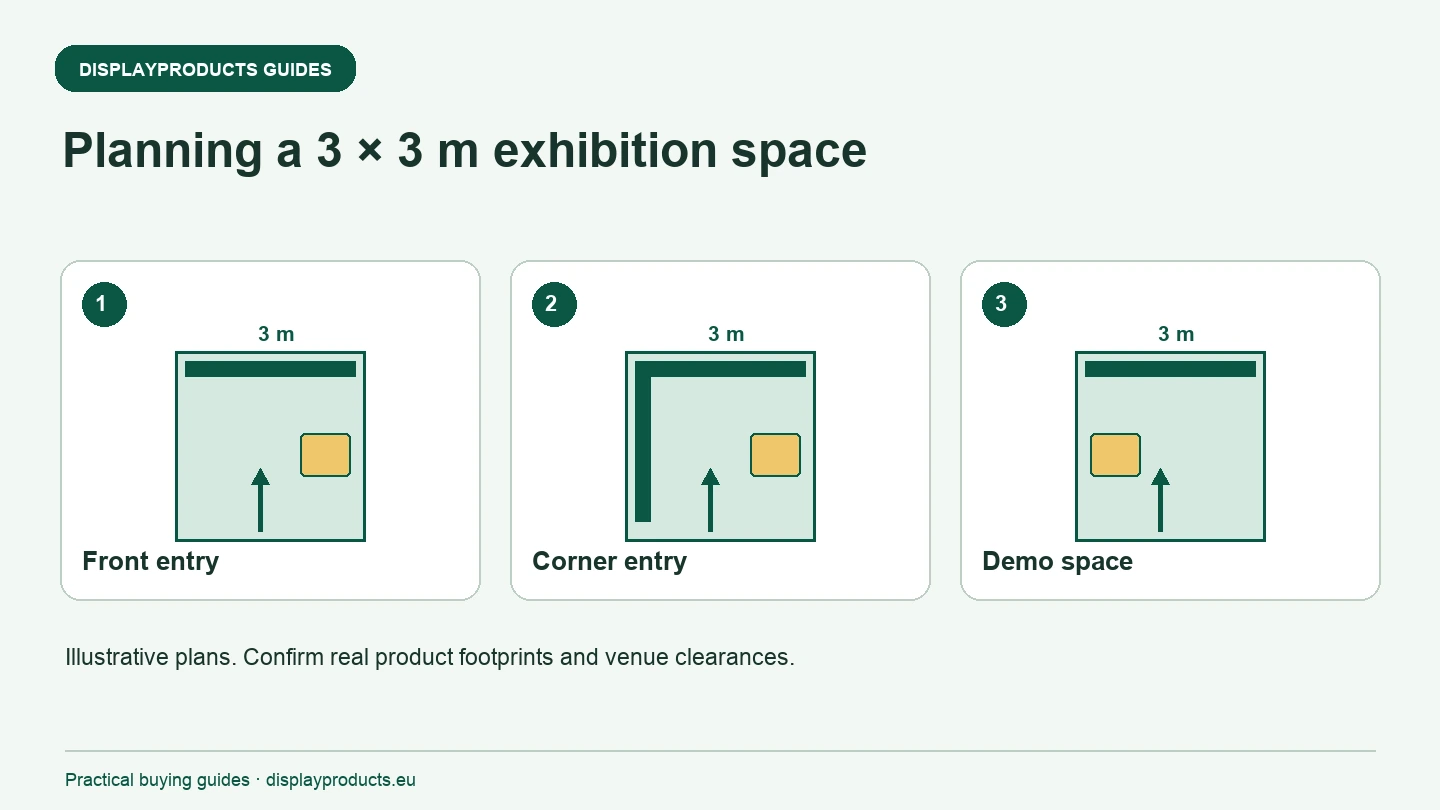
The three layouts below are planning examples, not installation drawings. Use the organiser's floor plan and the selected products' assembled footprints before approving a stand. A nominal 3 m graphic width does not prove that the complete frame, feet and connecting parts fit within a 3 m boundary.
Establish the boundaries before choosing a wall
Ask the organiser which sides are open, what neighbouring partitions are supplied and whether anything may be attached to them. Record the available height, electricity position, restrictions on projecting components and the route used to bring equipment into the hall. Keep entrances, emergency routes and the permitted boundary clear according to the venue's requirements.
Draw the assembled depth of each display, not just its visible print surface. Add the counter footprint, the place where staff stand and space for a visitor to stop. If you plan to demonstrate a product, include that product and its operating space. Cases, coats and spare printed material also need a defined position. Discovering these items after installation is how an apparently spacious drawing becomes a crowded stand.
Layout one for an inline stand
For a plot open at the front, place the main graphic along the back and put the counter to one side of the visitor entrance. This gives passing visitors a direct view of the message and leaves a route into the stand. A counter spanning the whole front can make the area feel like a barrier, especially when only one person is available to speak to visitors.
Keep the backwall message short enough to be understood from the aisle. Use the counter graphic or a supporting roll-up for a more specific offer. A brochure stand works best where someone who has stopped can use it without stepping into the aisle. Try the layout with staff and bags present before deciding that another display will fit.
Layout two for a corner plot
A corner plot usually has two open approaches. Orient the main graphic so it can be seen from both, and place the welcome point where staff can acknowledge visitors from either direction. You may use two graphic faces or a suitable corner configuration, but both the layout and any connection between frames need checking against the actual system.
Avoid filling the second open side simply because the plot has more frontage. An additional wall can remove the benefit of that entrance. Consider one strong backwall, a counter set back from the corner and a secondary message positioned within the stand boundary. Check that the counter does not conceal the lower part of a graphic that contains essential information.
Layout three for a demonstration
If the stand's purpose is to show a sample or explain a process, allocate the demonstration area before adding display furniture. Put the demonstration to one side and leave a place where two or three people can watch without preventing another visitor from entering. The required space depends on the demonstration; do not treat the illustration as a capacity claim.
Separate the message that attracts visitors from the details used during the explanation. The main wall should introduce the problem or benefit. The counter can hold the sample, while a nearby graphic supports the discussion. Confirm the counter's usable top area and loading requirements for your equipment. A portable promotional counter is not automatically suitable for a heavy or moving demonstration.
| Layout | Main purpose | Detail to check |
|---|---|---|
| Front entry | A clear introduction and short conversations | Counter position and display-foot depth |
| Corner entry | Visibility from two approaches | Open sides and graphic orientation |
| Demonstration | Showing a product or process | Equipment footprint and visitor stopping space |
Choose a system that suits the whole event cycle
Tension Fabric Exhibition Stands provide several configuration examples within one system. Use them to discuss the geometry you need, rather than treating every gallery image as a separate product. Tension Fabric Walls are a useful starting point for a defined backdrop. Match the chosen shape and width to the footprint, graphics and transport arrangement.
For the interaction point, compare Fabric Counters with the space allocated on the plan. Confirm the chosen model's dimensions and what is included. The important comparison is a complete usable arrangement: frame, print, feet, counter, transport and any lighting, rather than the width of the backwall alone.
Before ordering, mark each component on a numbered sketch. List which items are reused from earlier events and which need new graphics. Share the same sketch with the person approving artwork and the team installing the stand. This reduces the chance of producing a beautifully designed graphic for the wrong face or assembling a counter where the visitor route was meant to be.
What to send for a layout recommendation
Send the organiser's floor plan, dimensions, open sides, permitted height, event date and delivery country. Add the main activity, the number of staff, equipment dimensions and the transport vehicle or case constraints. If the venue supplies partitions or furniture, state which ones. A photograph of existing equipment is helpful when the new display needs to work alongside it.
Use the exhibition display brief checklist to organise those details. For a wider selection of suitable systems, browse Exhibition Stands. The final proposal should confirm the actual assembled footprints and the components supplied, so the layout can be checked before production.